

If you worried those arts-and-crafts skills you picked up at summer camp would go to waste, fret not: Your garden is rife with mosaic opportunities to make you a regular Gaudi.
Behold the watering can, a practical gardening tool crying out for some whimsy.
Additional Photos
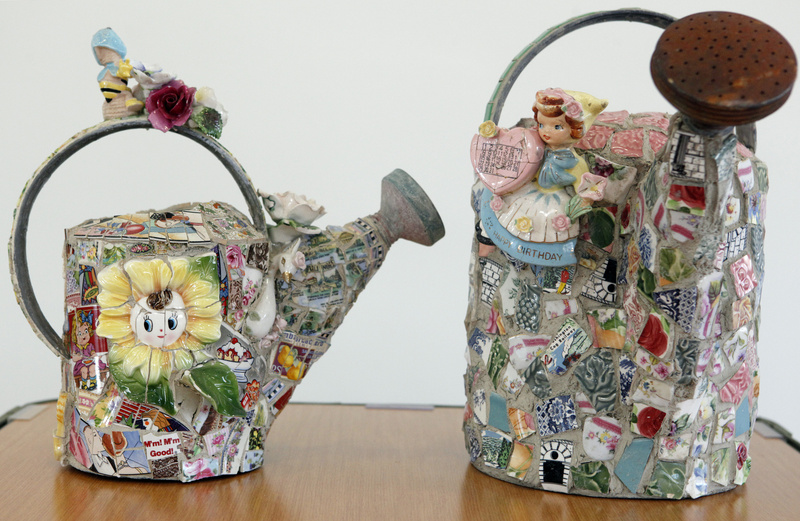
Using shards of china and porcelain figurines, mosaic artist Bonnie Arkin transforms old galvanized metal watering cans into adorable decorative pieces that have been sitting in her garden for years. Granted, the mosaic weighs the can down quite a bit so it’s impractical to use the completed can for actual watering, unfortunately. The same technique can be applied to flowerpots, planters, steppingstones, vases, birdhouses — and even bowling balls to create garden orbs.
Arkin, who has been teaching mosaic workshops at Chicago Botanic Garden for nine years, said the watering can is a sophisticated project, because the rounded surface will require you to work in sections and cut the pieces smaller as you go around the curve, which takes cutting skill as well.
TOOLS NEEDED:
(You’ll find these items at craft and hardware stores.)
Goggles
Tile nippers
Plastic bags
Putty knife
Premixed grout and adhesive
Sponge
Gentle scrubbing cleaner, such as Soft Scrub
Craft knife
DIRECTIONS:
1. Treasure hunt. Collect beautiful or endearing items you want to piece together into a mosaic. Traditionally, these are tiles or shards of china that can be found at flea markets and thrift stores or donated from family members. But widen your scope: buttons, charms, beads, coins, pebbles, sea shells, jewelry and even Lego pieces. Arkin advises against using cardboard, paper or fabric because they’re too fragile.
2. Break the china. Wearing work goggles, place a plate upside down inside a plastic bag; smack it once in the center with the tile nipper. (Arkin said one student who couldn’t bring herself to bash her china double-bagged it and ran over it with her car. For the sake of your tires and anyone in the vicinity, we are not recommending this.) This type of mosaic is called pique assiette.
3. Cut the shards. Keep your goggles on. To cut large shards into smaller pieces, hold a shard in the mouth of the tile nipper, less than one-quarter inch, and squeeze the handles for a clean break. That’s called “nipping.” You typically want your pieces to be the size of postage stamps, but go larger or smaller to stay proportional to the frame you’re working with. To shape the shards into circles, use your tile nipper to nibble at the edges. That’s called “chipping.”
4. Apply the grout and adhesive. Traditionally, mosaic artists affix their pieces to the surface with adhesive before spreading grout on top — a good strategy if you’re working on intricate designs; Arkin prefers to save time by purchasing premixed grout-and-adhesive-in-one (such as Simplefix) and slathering it on in one step. Rest the can on its side on a towel. Using a putty knife, spread a quarter-inch layer of the grout-adhesive mixture over the can surface.
5. Design. Lay your items out like puzzle pieces and let your creativity guide you. You may have to cut pieces smaller as you go around the curve of the can so that they will rest flat. It’s important to “butter” the back of every piece with the grout-adhesive mix before pressing it onto the can so that it sticks better. If the grout starts to stiffen, dip your fingers in water and wet it. If you make a mistake, pull the pieces off, put them in water and start again. Wipe the grout off the front of the shards with a wet sponge as you go along to keep the grout from drying on top.
6. Wait. Let the can dry for a week. Because it’s round, you have to work in sections, letting the first section completely dry before turning it over to do the next area, and so on.
7. Tuckpointing. Use a gentle scrubbing medium, such as Soft Scrub, and a scouring sponge to scrub and buff the surface; scrape off any dried grout with a razor blade or X-acto knife. The grout will shrink and crack as it dries, so you will need to spread another layer of grout on top of the finished piece to fill in the grooves. Smooth it over with a wet sponge immediately — you don’t want the grout to dry on top.
8. Wait again. Let the can dry another three days, and you’re done! If you wish, add more decorations, like porcelain flowers or a string of pearls, with glue; Arkin recommends Household Goop.
BRAVING THE ELEMENTS
If your mosaic art is going to be living outside, take some extra steps to protect it from the elements.
Mosaic artist Becky Paton, whose recently released book “Garden Mosaics” (CICO Books, $19.95) showcases 25 step-by-step projects for sun catchers, candleholders, placemats and papier-mache cone planters, offered these tips for helping your projects survive the outdoors:
Use waterproof and frost-proof grout containing sand.
If you prefer to glue your pieces to the watering can before you spread on the grout, use a cement-based adhesive.
If the watering can is metal and painted, rough up the paintwork to add extra grip. If it’s a plastic can, score fine lines in it with a craft or paring knife.
When working on porous surfaces such as wood or terra cotta, coat with a primer first. Make your own primer using one part PVA. (wood glue) and three parts water.
And bring your mosaic piece indoors in very cold weather.
Send questions/comments to the editors.

Success. Please wait for the page to reload. If the page does not reload within 5 seconds, please refresh the page.
Enter your email and password to access comments.
Hi, to comment on stories you must . This profile is in addition to your subscription and website login.
Already have a commenting profile? .
Invalid username/password.
Please check your email to confirm and complete your registration.
Only subscribers are eligible to post comments. Please subscribe or login first for digital access. Here’s why.
Use the form below to reset your password. When you've submitted your account email, we will send an email with a reset code.