


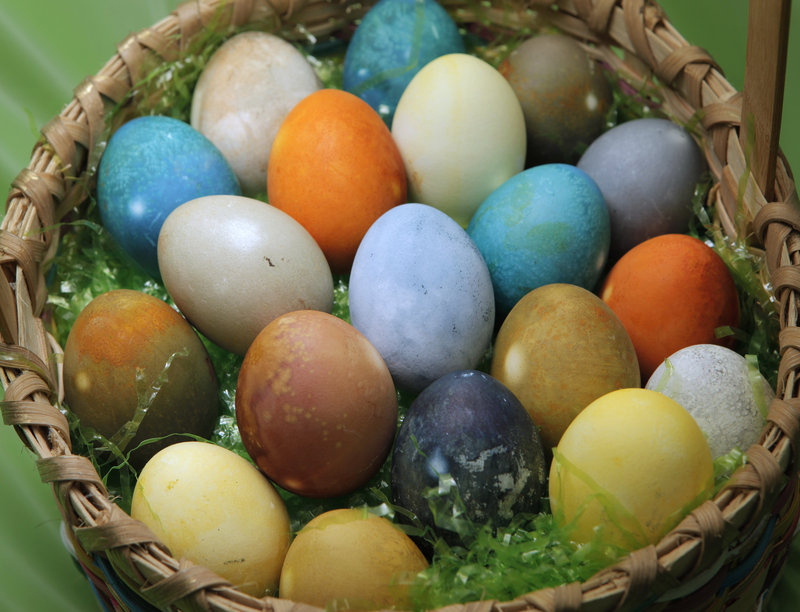
Easter is approaching, and that means lots of brightly colored eggs and candy will be filling baskets and little mouths.
This year, those sunny yellows, cool blues and deep pinks of spring may be giving some families pause because of the recent debate over the safety of food dyes.
Additional Photos

Recently, an advisory panel of the U.S. Food and Drug Administration concluded that there’s not enough scientific evidence yet that foods containing artificial dyes are harming the general population, but the dyes might trigger hyperactivity in a small percentage of children with behavioral problems. The panel said more research is needed.
Artificial dyes can seep through cracks in Easter eggs, and some colors may leach through the porous shells. Should you be worried?
Peter Knight, a doctor of naturopathy at True North, a health-care center in Falmouth, said if you know your child is not sensitive to food dyes, “then it’s probably not an issue.”
“Not all children are sensitive to food dyes,” he said. “But if you know your child has an issue with the dyes, then when you open up the egg if you notice any discoloration, that’s coming from the dye, so I would recommend for them not to consume that egg.”
Here’s another alternative: Try using natural dyes.
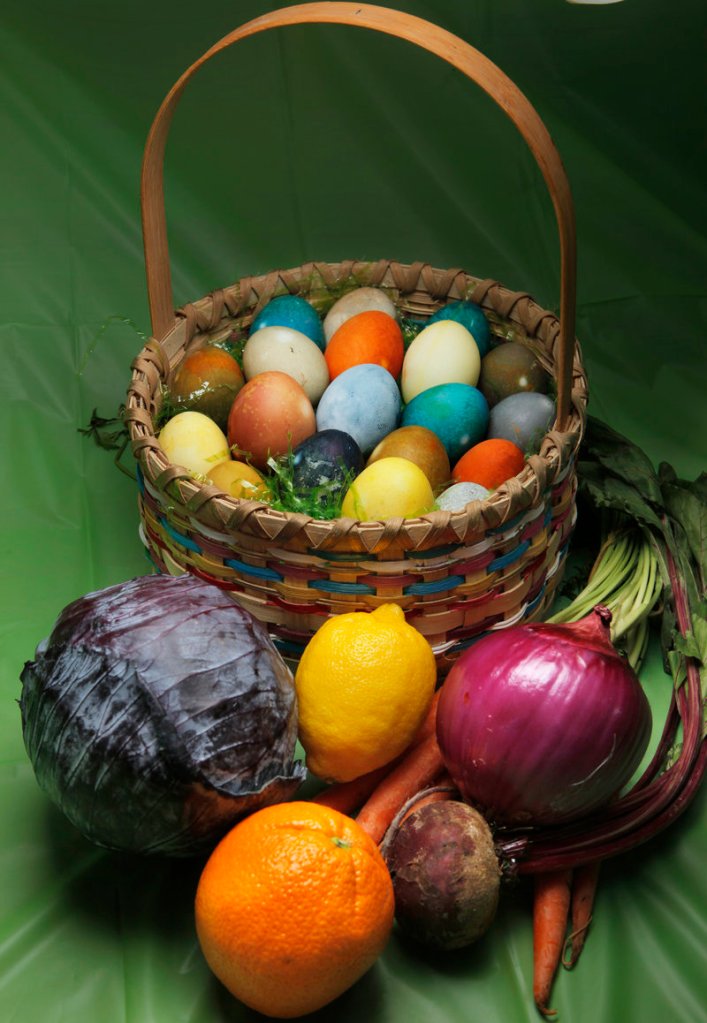
There’s lots of information on the Internet about using fruit, vegetables, tea and spices to color Easter eggs. Do these techniques really work? How do the colors compare? I recently tapped into my inner 6-year-old and spent a great deal of time in my kitchen experimenting so you don’t have to.
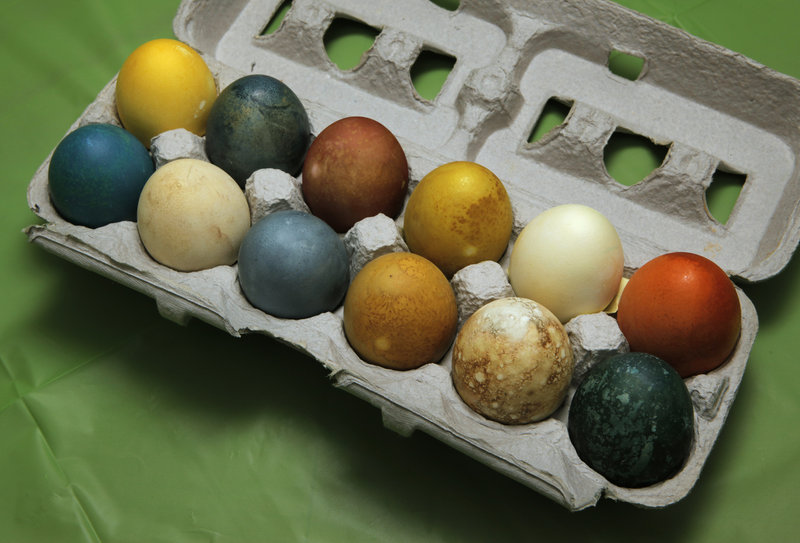
I was pleasantly surprised by some of the results and disappointed in others. I made some gorgeous blue eggs with red cabbage and blueberries, yet the color rubbed off some of the pink eggs I tried to make. Some eggs that I expected to be green or yellow came out brown or tan.
Here’s how I did it. And, accompanying this column below you’ll find my suggestions and recommendations for natural dyes if you want to try it yourself:
This may seem obvious, but first you have to boil some eggs. Place the eggs in a single layer in a pan. Bring them to a boil, then remove them from the heat and let them sit, covered, for 12 to 15 minutes, depending on how large they are. Put the eggs in the fridge until you’re ready to dye them.
Some instructions suggest boiling the eggs with the dyes to get deeper colors, but when I tried that, the egg cracked all over.
Next, prepare your natural dye materials.
Unless you’re using canned fruit or straight juices such as grape or cranberry juice, most of your dye materials will have to be boiled to release their color. There are all kinds of formulas out there, but for most of my dyes, I filled a pan with a little more than 2 cups of water and then added a couple of tablespoons of vinegar, which acts as a fixer for the color.
Some people add the vinegar after the boiling, but apparently boiling the vinegar with the dye material can result in much deeper colors, so that’s the method I used.
I boiled my dye materials – everything from onion skins to carrot tops – for about 15 minutes to be sure I got good color. Then I strained the colored water (you can use cheesecloth or a fine strainer) and poured the liquid into a pint-sized canning jar.
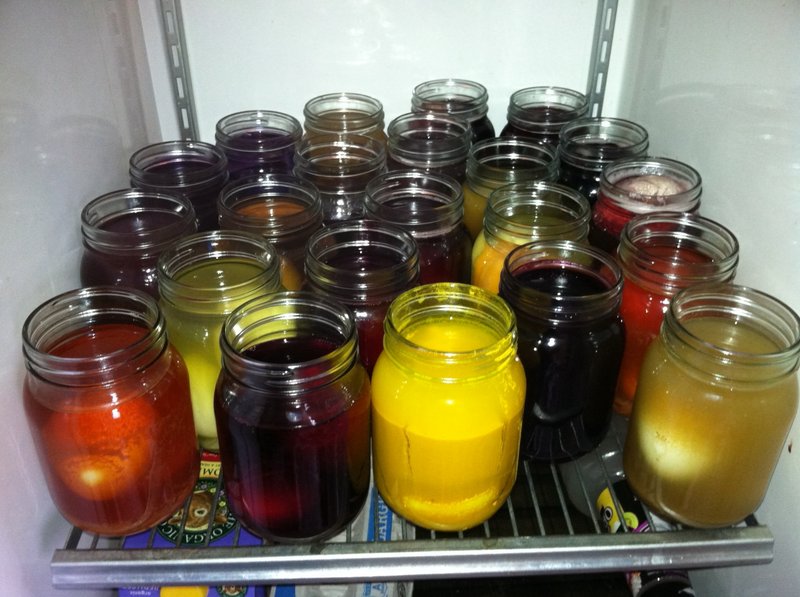
I bought a couple dozen canning jars to dye the eggs in, because I wanted to leave them in the refrigerator overnight. (Supposedly, this produces deeper colors.) I needed two dozen jars because I was experimenting. Unless you’re having a party or want to do some experimenting yourself, a dozen jars will be plenty.
Next, I added the eggs (a pint jar is the perfect size for dying two eggs) and put the jar in the refrigerator.
All of this was a lot of work, but it really paid off the next day. It may be Eastertime, but I felt like a kid on Christmas morning every time I gently lifted an egg from the dye with a spoon and saw what color it had become overnight.
At first, I made the mistake of washing some of the eggs off after they came out of the dye. (Some of them seemed slimy.) That, however, turned out to be a mistake. In most cases, they still had color after washing, but it was much more subtle. In some cases, the washing almost completely removed the color. I recommend letting the eggs dry completely before handling them in any way. Even lifting the eggs out of the dye with a spoon can leave marks when they’re still wet, so be very careful.
After you let the eggs dry, you can “polish” them with some vegetable oil to give them a nice sheen.
With one or two exceptions, this technique produces subtler colors that look more natural. I think they are prettier than the artificial colors, and would be perfect for an Easter egg hunt or as decorations for an Easter party.
These naturally colored eggs don’t have all the extras (glitter, anyone?) that come with the egg decorating kits, but you can still use the old writing-with-a-crayon trick. And some of the eggs come with their own “decorations” in the form of a natural-looking mottling that occurs on some of them.
Happy dyeing, and here’s hoping the Easter bunny adds lots of chocolate eggs to your basket.
Staff Writer Meredith Goad can be contacted at 791-6332 or at: mgoad@pressherald.com
Follow her on Twitter at: Twitter.com/MeredithGoad
EGGSPECTATIONS
CRANBERRY JUICE: This doesn’t have to be boiled; just set the eggs down in the juice. The result is an egg that is, initially, the color of red wine. (Some people suggest using red wine to get the same color, but to me that is just a waste of good wine.) The cranberry juice dye came off too easily in my overnight batch. I tried it again, soaking the eggs for just a few hours, and had much better results. Recommended with reservations.
GRAPE JUICE: In the overnight batch, one egg came out pale with barely any color, and the other came out a nice purplish-blue, but with uneven color. I soaked another egg the following day and, like the cranberry juice, had much better results with more even color. Recommended with reservations.
POMEGRANATE JUICE: The color on one egg came right off, but the other came out a pretty brownish mottled color, kind of like the egg of a wild bird. Initially I wanted to tell you to stay away from this juice, but I got so many oohs and ahhhs over the pomegranate egg in the newsroom I decided to change my recommendation. People said they thought the egg looked like a dinosaur egg, or a planet. Recommended.
RASPBERRY ZINGER TEA: You might think that raspberries and hibiscus, both found in this tea, would produce pink eggs. Mine came out a pretty sage green. Recommended.
CANNED TART CHERRIES IN SYRUP: No boiling necessary. I poured these into a bowl first, and mashed the cherries a bit. Then I filled a canning jar with cherries and syrup, and lowered a couple of eggs into the mixture. The result? A beautiful deep blue. Highly recommended.
SPINACH: I boiled some frozen spinach for this batch. The eggs came out a lovely light green. Recommended.
GREEN TEA: This worked too, but it produced a brighter green than the spinach. Recommended.
RED ONION SKINS: These are supposed to turn eggs red or violet, but mine came out a deep green. Go figure. It was a nice green, though. Recommended.
RED ONION SKINS WITH POMEGRANATE JUICE: This combination was supposed to make a darker color. One came out a deep greenish purple; the other a greenish brown. Recommended only if you really like purple and don’t mind experimenting until it comes out right.
RED CABBAGE: This was my favorite. If you make only one color of egg this Easter, let this be the one. Yes, it’s red cabbage, but the egg comes out a gorgeous, deep, royal blue. Highly recommended.
I also did a variation where I included some shredded red cabbage in the jar with the dye and the egg. Some folks say this gives the egg a pretty tie-dye-like design. Didn’t work for me, but the color still turned out well.
BROWN EGG BOILED IN RED CABBAGE DYE: I read on the Internet that a brown egg boiled in red cabbage dye and then left in the fridge overnight would turn a royal blue. I did get blue, but it was a deep blue – almost black – color when it first came out of the dye. After drying for a while, it looked very similar to the blueberry eggs. Recommended with reservations.
CARROT TOPS: Carrot tops are supposed to make a yellow egg, but again, I got green. It was a golden yellowish-green that looked like a color you’d find in a wild egg. I’m not too crazy about it for Easter. Not recommended.
ORANGE PEEL: This produced a very light orange egg, a color so pale it was almost not there at all. It was quite pretty if you like really subtle colors, and it would probably make a great paint color. For Easter, I normally wouldn’t recommend it. But it sure did look nice sitting in a basket nestled among the brighter eggs. Recommended with reservations.
BLUEBERRIES: I used frozen blueberries. Again, I put the blueberries in a bowl and mashed them up a bit before boiling. These eggs came out a beautiful dark blue, the exact color of blueberries. Recommended.
BEETS: This is another one of my favorites. The eggs initially came out of the dye a beautiful blood-red color. Unfortunately, as they dried, they lost a lot of their brightness. They’re still pretty, though. Highly recommended.
I did another version of the beets with an egg covered in rubber bands. Why rubber bands? Who knows – it was a suggestion I found on the Internet. It did make a pretty cool design.
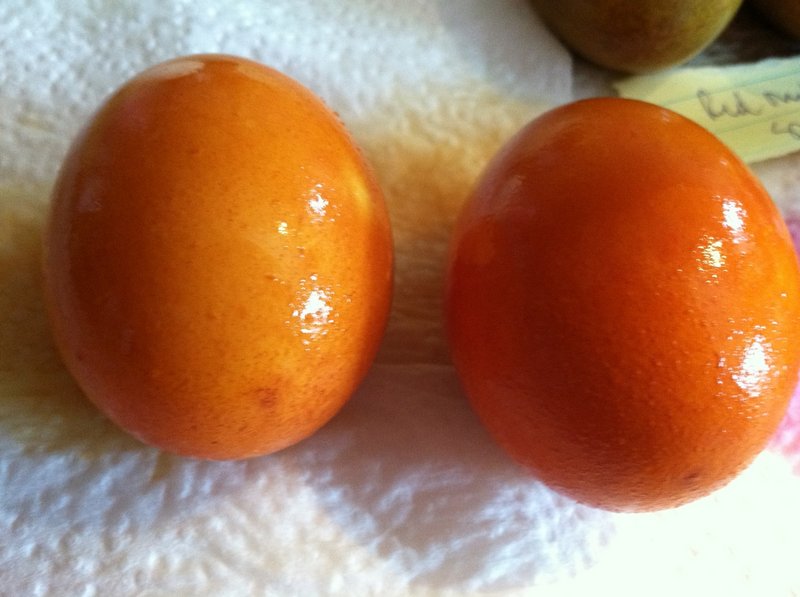
YELLOW ONIONS: I hate – I mean, really hate – onion skins. They stick to your fingers and clothes, they fall on the floor, and they are impossible to sweep up because they stick to the broom. But they sure do make some pretty Easter eggs. They come out a beautiful dark orange. Highly recommended.
GROUND CUMIN: This is supposed to produce yellow eggs, but they come out a pale brown. Not recommended.
LEMON PEEL: If you like yellow, you’ll like this pretty, light color, like lemon chiffon. Recommended.
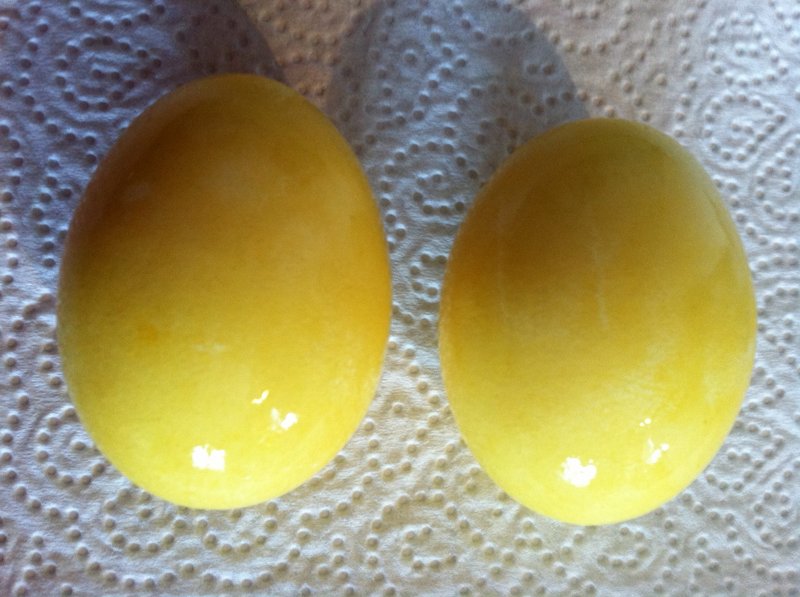
TURMERIC: Be careful using turmeric, because it stains everything. The upside is that it also stains eggs – a bright, sunny yellow. You can even wash this one – and you’ll have to, because the wet spice sticks to the egg like a paste – but it won’t affect the color. Highly recommended.
Send questions/comments to the editors.

Success. Please wait for the page to reload. If the page does not reload within 5 seconds, please refresh the page.
Enter your email and password to access comments.
Hi, to comment on stories you must . This profile is in addition to your subscription and website login.
Already have a commenting profile? .
Invalid username/password.
Please check your email to confirm and complete your registration.
Only subscribers are eligible to post comments. Please subscribe or login first for digital access. Here’s why.
Use the form below to reset your password. When you've submitted your account email, we will send an email with a reset code.