

By the time you read this, I will have installed two packages of replacement bees into hive boxes sitting on a hill in Wiscasset overlooking the Sheepscot River. None of the colonies that my beekeeping buddies, Ann and Mark Light, and I set up last year survived the winter. We didn’t send bee remains off to a lab, but we know our girls most likely succumbed to a virus they picked up after being infested with varroa mites.
While the Maine State Apiarist won’t release results of its annual beekeeper’s survey for the 2020-21 season until July, we’ve got anecdotal evidence that other beekeepers failed to overwinter their colonies, too. A mentor lost two of his four hives. A woman on our regional Facebook beekeeping page took her hives’ failing as a sign it was time to hang up her bee suit after a good 20-year run. And a favorite YouTube beekeeping guide was nearly brought to tears as he learned, on camera, that 23 of his 24 hives didn’t ring in the new season.
We have plans to do many things differently this year, starting with the bees themselves. We had Italian bees and Russian hybrid bees last season. As pure-bred Russians have a reputation for more adeptly fighting off mites, we’re running with them this year, bucking fears that they might be ornerier as well. And we’ll test for mites early and often, treating them as soon as the numbers slip just over established thresholds. We’re rethinking our strategy for splitting hives should they get too big too fast, and we’re reformulating our hive winterization setup come November.
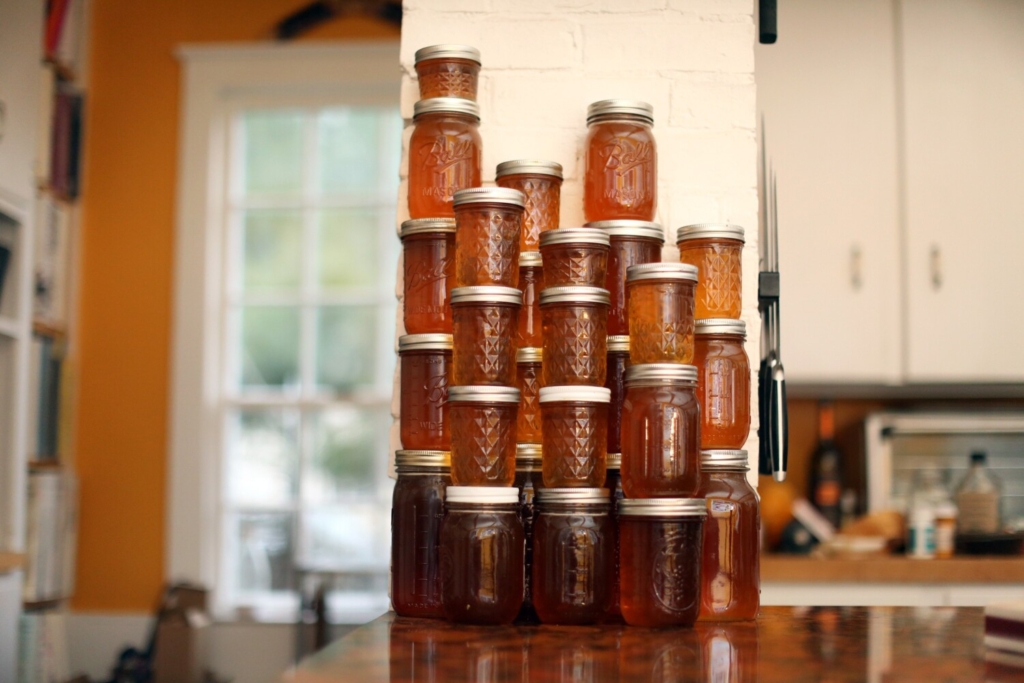
A big yield of honey (sadly, it indicates the bees didn’t survive). The darker honey was likely made from golden rod. The lighter honey probably comes from raspberry and blueberry blossoms the bees pollinated. Ben McCanna/Staff Photographer
We also had to do something with the honey we’d saved to feed to Queen Latifah’s, Beeatrix’s and QEIII’s hives this spring. We’d hoped they’d need every drop, so had not planned on taking any for ourselves. But in the face of the complete wipeout, we turned my garage into a honey extraction site. The process was sticky, sweet and therapeutic.
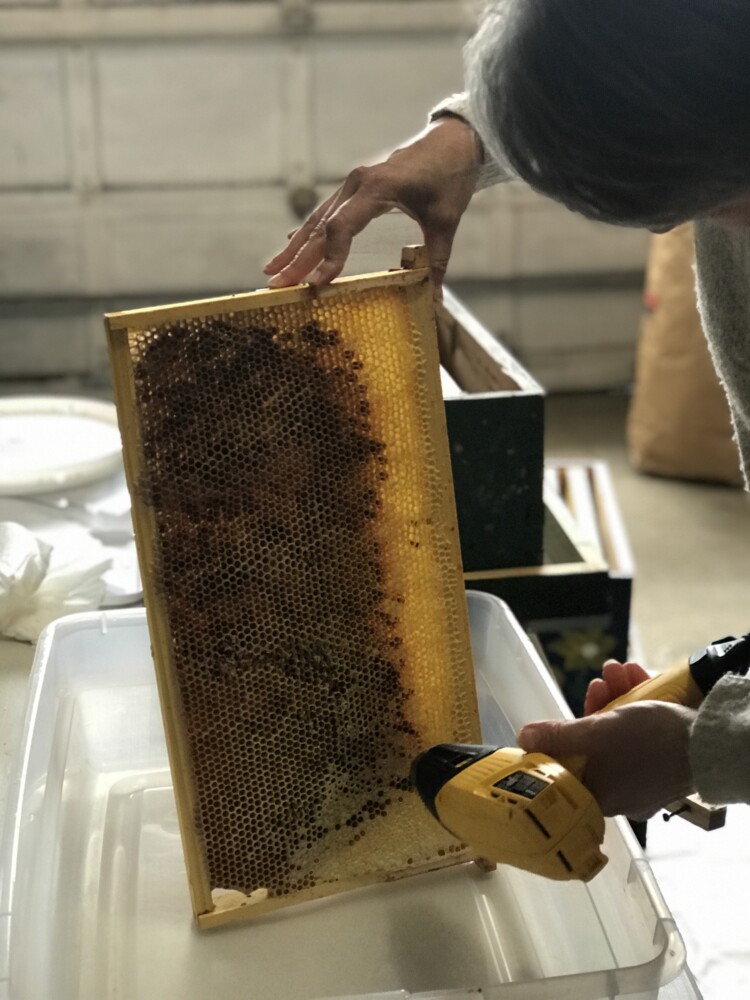
Ann Light melts the caps of honey cells with a heat gun. Photo by Christine Burns Rudalevige
Besides honeycomb, the primary piece of gear required for honey extraction is a stainless-steel centrifuge kitted out to hold hive frames. We borrowed a manual extractor from the Knox-Lincoln County Beekeepers Association. I’d pictured something the size of an old countertop ice cream machine my grandmother had, but what arrived was more the size of a half keg, its legs bolted to a piece of plywood so it won’t waddle away as you turn the hand crank.
To prep the frames before sliding them, three at a time, into the extractor, every cap on every hexagonal honey cell must be removed. All made of beeswax, some caps sit directly on top of the honey while others have a bit of air between them and the honey. We used a heat gun to melt the latter (YAY!) but had to scrape the others with a tool that looks like a large version of the comb you’d use to find nits in your kids’ hair (BOO!).
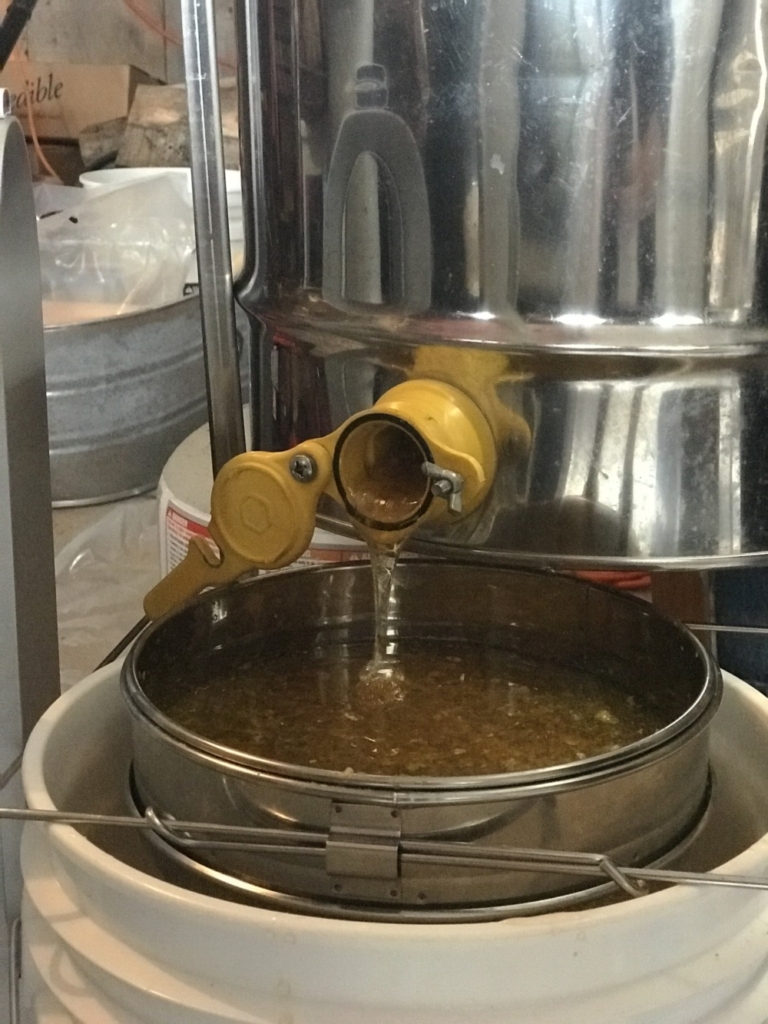
Honey flowing out of the bottom of the extractor through a series of strainers into a five-gallon bucket. Photo by Christine Burns Rudalevige
Elbow grease – or an electric drill – powers the extractor. Spinning the frames slowly, flipping them (bees can place honey on both sides of a frame), and a few more slow turns balances the weight of the honey in the frame. It’s important not to damage the comb, as the frames can be added to our current hives, giving our Russian ladies a leg up on how much wax they need to make for their honeycomb. Then you just crank the machine up to speed so the honey flies out, hits the sides of the extractor and flows down.
A spigot at the bottom of the extractor leads the honey through a series of strainers and into a five-gallon bucket. A spigot on the bucket opens to make it easy to get the honey into jars. We used every canning jar in both of our houses to contain the 12 gallons (about 144 pounds) of honey. At the beginning of the process, we’d separated lighter frames of honey, most likely made from nectar collected by the acre of raspberry thicket on Ann and Mark’s property in early spring, from the darker ones, most likely made from goldenrod nectar in late summer. The raspberry blossom honey is light and has a bit of a tang, while the goldenrod honey is rich and sweet.
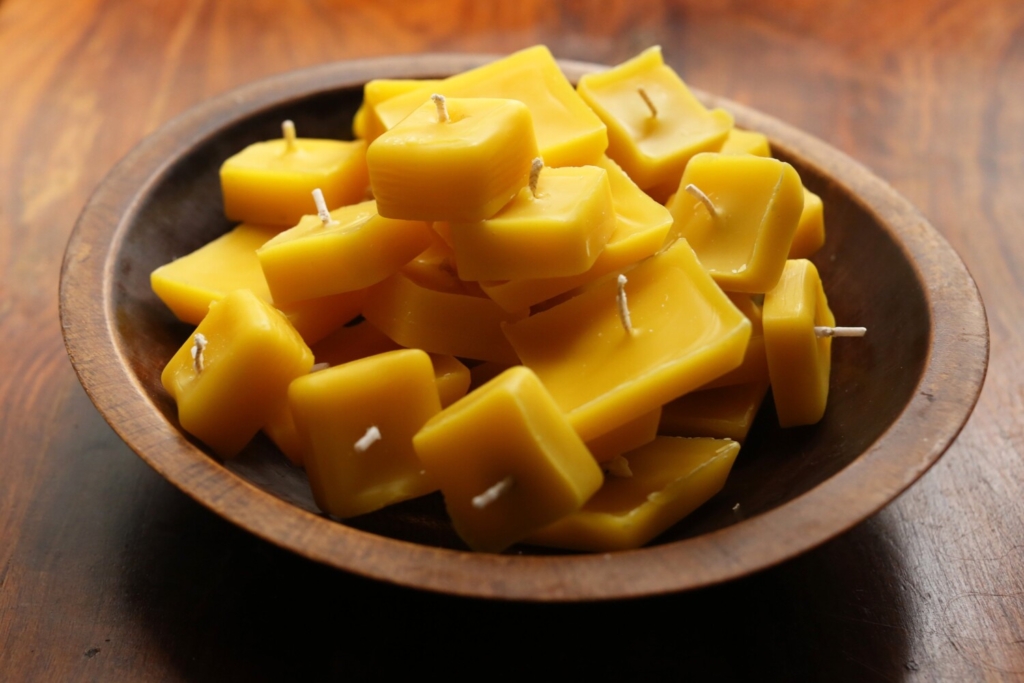
Candles made from the beeswax that fell off the frames of honeycomb when the honey was extracted. Ben McCanna/Staff Photographer
Since our bees, even in their demise, were so generous to us, we felt it fitting to honor them by not letting any of their efforts go to waste. We made candles from the caps we scraped off the comb. The floral scent is a comforting reminder of their invaluable work.
Christine Burns Rudalevige is a food writer, recipe developer, tester and cooking teacher in Brunswick, and the author of “Green Plate Special,” a cookbook from Islandport Press based on these columns. She can be contacted at: cburns1227@gmail.com
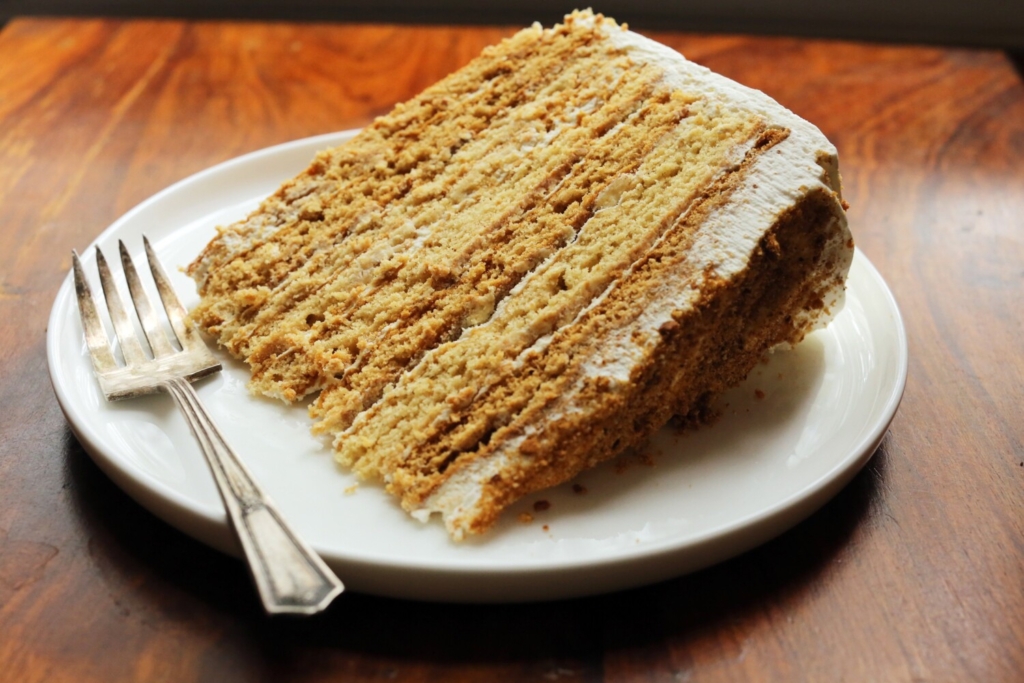
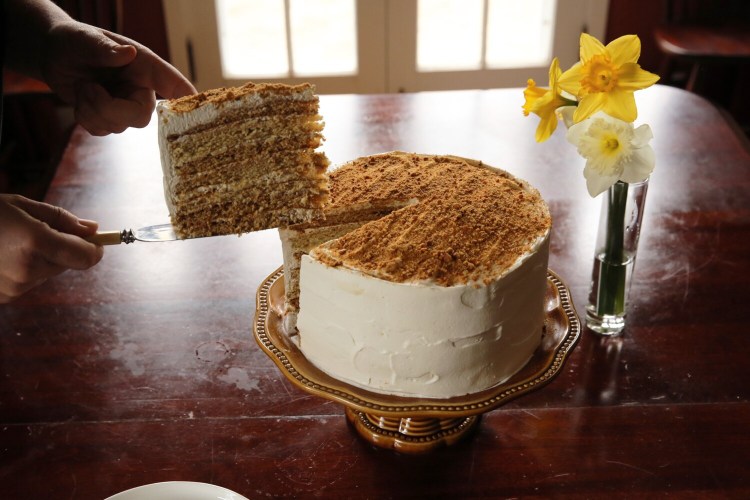
A slice of Nine-Layer Russian Honey Cake, made with the columnist’s own honey. Ben McCanna/Staff Photographer
Layered Russian Honey Cake
You can find this recipe all over the internet. It’s a labor of love, but well worth the effort. I’ve adapted it so that the cake is sweetened entirely with local honey. If your honey stash is less flowing than mine, substitute the 1½ cups of regular honey plus ¼ cup burnt honey called for, with 1 cup granulated sugar, ½ cup regular honey and ¼ cup burnt honey. To reduce food waste, save the edges you trim off the layers of cake. Grind them into crumbs and use them to decorate the top of your cake.
Serves 12-16
FOR BURNT HONEY:
3/4 cup honey
FOR CAKE:
2½ teaspoons baking soda
3/4 teaspoons salt
1 teaspoon ground cinnamon|
1/4 cup Burnt Honey
1½ cups honey
14 tablespoons unsalted butter, cut into 1/2-inch pieces
6 large eggs, cracked into a measuring cup
3½ cups (420 g) all-purpose flour
FOR FROSTING:
1/2 cup Burnt Honey
1/2 teaspoon fine salt
5 cups heavy whipping cream
1 cup sour cream
Adjust oven rack to middle position and preheat oven to 375 degrees. Line 2 or 3 (or more) baking sheets with silicon mats.
To make the burnt honey, pour 3/4 cup of honey into a 2-quart saucepan and set over medium-high heat. Bring to a boil and reduce heat to medium. Continue to cook the honey, stirring it with a heat-proof spatula, until the color changes to dark amber; about 3 minutes. Turn off the heat and carefully whisk in 1/4 cup water. Set aside.
To make the batter, combine the baking soda, salt and cinnamon in a small bowl and set aside.
Fill a large saucepan with 2 inches of water and place the pan over medium high heat. In a large, heat-proof bowl that will fit inside your saucepan to make a double boiler, combine 1/4 cup burnt honey, 1½ cups honey, and the butter. Place the bowl over the saucepan, making sure the simmering water is not touching the bottom of the bowl.
Gently stir the mixture until the butter has melted, then whisk well to combine. When the temperature of the mixture is warm to the touch but not hot, add the eggs, one at a time, whisking after each addition. When the mixture is once again warm to the touch, add the cinnamon mixture, and whisk for 30 seconds. The batter will begin to foam, remove the bowl from the heat.
Pour the flour into the bowl through a fine-mesh sieve, stopping 2-3 times to whisk the flour into the wet ingredients. The batter will spread more easily when it’s warm, so remove the saucepan with the simmering water from the stove, and place the bowl back on top of it.
Spoon a 1/2 cup of batter into the middle of one silicon mat. Use an offset spatula to evenly spread the batter into a smooth, 9-inch circle. Repeat this process until you’re out of lined baking sheets. Ultimately, you should end up with 9-10 layers.
Bake each layer for 6 to 7 minutes, until the cake turns a deep caramel color and springs back at the touch, and a toothpick inserted in the center comes out clean. When each layer is baked, slide the silicon mat off the baking sheet to prevent overbaking. If you are reusing baking sheets while they are still hot, reduce cooking time to 5 to 6 minutes.
When the cake layers are cool enough to handle, cover them with a 9-inch plate and use a sharp knife to trim them into uniformity. Collect the trimmings and crush them into crumbs to use to decorate the cake
To make the frosting, put the 1/2 cup burnt honey, salt and 1 cup heavy cream in a medium bowl. Whisk by hand until combined in order to thin the honey. Chill for 30 minutes. (Trust me, you’ll have whipped cream EVERYWHERE if you fail to do these steps.) Pour the remaining 4 cups heavy cream into the bowl of a stand mixer fitted with the whisk attachment. Whip at medium speed to soft peaks, about 6 minutes, add the honey mixture and sour cream, and whip to medium stiff peaks.
To assemble the cake, place 1 cake layer in the center of a large plate. Place a scant cup of frosting onto the center. Use an offset spatula to spread the frosting evenly, leaving a 1/4-inch ring around the edge. Continue with alternating layers of cake and frosting, ending the last layer with frosting. Use any leftover frosting to smooth out the sides of the cake. Cover the top of the cake with crumbs. Chill the cake in the fridge overnight to give the frosting time to meld into the cake layers and soften them. Slice into thin wedges and serve cold. Cake can be made up to 2 days in advance.
Send questions/comments to the editors.

Success. Please wait for the page to reload. If the page does not reload within 5 seconds, please refresh the page.
Enter your email and password to access comments.
Hi, to comment on stories you must . This profile is in addition to your subscription and website login.
Already have a commenting profile? .
Invalid username/password.
Please check your email to confirm and complete your registration.
Only subscribers are eligible to post comments. Please subscribe or login first for digital access. Here’s why.
Use the form below to reset your password. When you've submitted your account email, we will send an email with a reset code.