

I am the queen of the baking shortcut, for despite my deep and powerful love of all things sweet, I’m impatient and awfully fond of instant gratification. I gravitate toward recipes with short ingredient lists and instructions that don’t require any heavy equipment (stand mixer, I’m looking at you) and can be assembled using only one or two bowls.
So, although I enjoy the texture achieved by creaming together butter and sugar in a mixer for a fluffy yellow cake or a chewy sugar cookie, what I really dig is a baked good that calls for oil rather than butter.
Baking with oil not only requires less work, and results in fewer dirty dishes, than butter, but it also produces tender, moist baked goods that get better with age and boast an impressively long shelf-life. As such, I not only search out baking recipes calling for oil, but when developing such recipes myself, which I do for a living, I try to create those that are oil-based.
Below is a breakdown of some of the impressive attributes of an oil-based baked good, as well as tips for substituting oil for butter in your favorite baking recipes.
• Why you should be baking with oil
Baking with oil is faster and easier than baking with butter. Because oil does not need to be melted and then cooled, or creamed for 5 minutes until fluffy, and is instead added straight-up to the recipe’s wet ingredients, assembly is faster and there is no need to dirty a saucepan or pull out your mixer.
Baking with oil produces moist and tender baked goods. Because oil is liquid at room temperature, it produces exceptionally moist baked goods. Butter, on the other hand, is solid at room temp, and therefore baked goods made with it are (arguably) a tad more dry. Baked goods calling for oil are also extra tender because there is less opportunity to develop the gluten in the flour by overmixing the batter. Overmixing a thicker batter, like one with creamed butter, is hard to avoid and can result in a tougher treat. Moreover, butter contains water, which also contributes to gluten development. Oil, on the other hand, has no water and is 100% fat.
Baked goods made with oil have a long shelf-life and actually age better. A baked good made with butter typically begins to dry out after a day or two on the counter, while the flavor and texture of those made with oil intensify over time. In short, nothing says “make-ahead dessert” like an oil-based baked good.
• How to substitute oil for butter
Substitute oil in any of your baking recipes calling for melted butter. I always get a little giddy when I see a recipe calling for melted butter, like a cake or even some cookies, because I know I can substitute oil in its stead. Because they are both liquid fats, not only will subbing oil for the butter not negatively affect the baked good, but it will actually improve it (for all the reasons listed above). However, if a recipe calls for creaming butter, you may indeed run into trouble if you substitute, as the texture of the baked good is probably dependent on that creaming process.
Substitute 3/4 of the melted butter in a recipe with oil. Because butter is about 80% fat and 20% water, and oil is 100% fat, when substituting oil for melted butter in baking recipes it is a good idea to use a little less oil, about 3/4 to 7/8 the amount of butter. So, if a recipe calls for 8 tablespoons of butter, you would substitute with 6 or 7 tablespoons of oil. Some bakers recommend a one-to-one substitution, but in my experience, a touch less is just about perfect.
Substitute the melted butter in your recipe with nut, seed or olive oil for more flavor. Adding flavored oils to baked goods makes them extra flavorful in ways butter can only dream about. For example, try substituting walnut oil in a banana bread that calls for walnuts and a peppery olive oil in a muffin recipe calling for cheese and prosciutto. Using a complementary flavored oil subtly enhances the ingredients already present, elevating them.
Substituting oil for butter when you bake, contributes so much at every stage of the game: from assembly to flavor and texture to shelf-life. And on top of that, many consider oil to be a healthier alternative to butter (although I’m team “everything in moderation”) and is a great choice when baking for someone with a dietary restriction that includes butter.
So consider giving oil a try the next time you come across melted butter in a recipe. You may discover that butter might just need to watch its back.
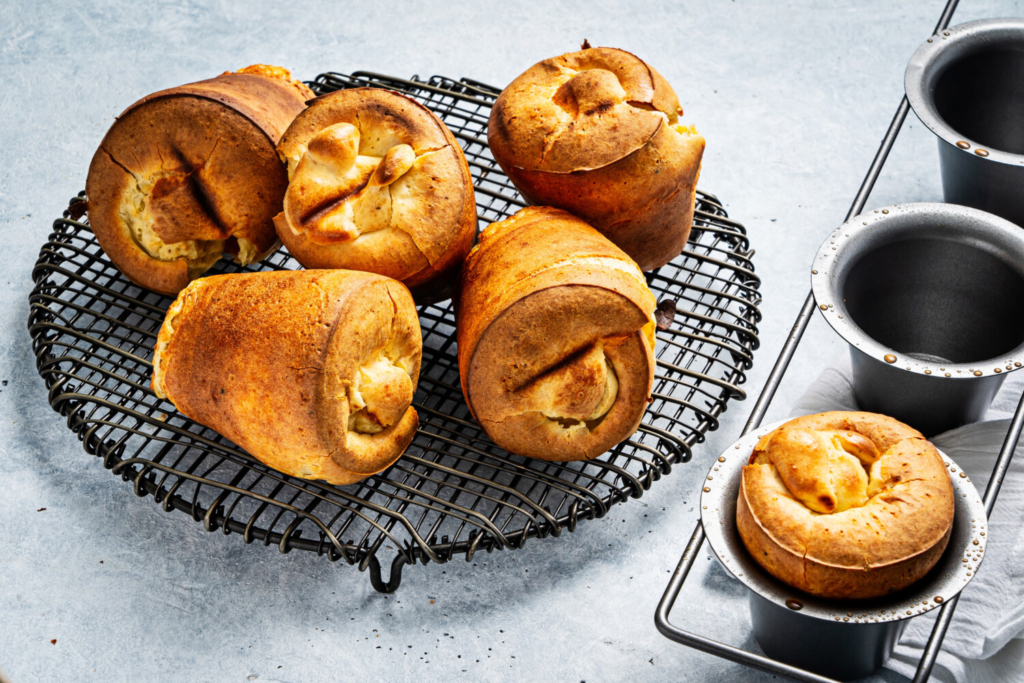
Cacio e Pepe Olive Oil Popovers Photo by Scott Suchman for The Washington Post
Cacio e Pepe Olive Oil Popovers
Active time: 15 minutes | Total time: 40 minutes
6 to 12 servings (6 popovers if baked in a popover pan, or 12 if baked in a muffin tin)
Popovers are not only one of the most impressive-looking baked goods you can make, eliciting “oohs” and “ahhs” every time, but they are also one of the easiest. A simple batter of flour, eggs, milk and, traditionally, melted butter is whirled about in a blender, poured into a hot pan and baked for about 25 minutes. The popovers rise tall while in the hot oven, ballooning over the edge of the pan and emerge with crispy outsides and custardy insides.
A popover pan makes for the tallest of popovers, but if you do not have one, a muffin tin will work, too. Be sure to bring your eggs and milk to room temperature before assembling the batter, as cold ingredients will hinder the popovers’ dramatic rise.
Storage: Popovers are best eaten hot, but leftovers can be stored in an airtight container and rewarmed in a preheated 350-degree oven for about 10 minutes.
NOTES: Olive or vegetable oil will work in this recipe, but a fragrant, peppery olive oil, such as Frantoia brand adds wonderful flavor.
If using a regular muffin tin, fill the cups 2/3 to 3/4 of the way full and bake them for 20 to 25 minutes, reducing the oven temperature to 350 degrees after 15 minutes and checking on them at 20.
INGREDIENTS
4 large eggs, at room temperature
1 1/3 cups (315 milliliters) whole milk, at room temperature
1/4 cup (60 milliliters) olive oil, plus more for greasing the pan (see NOTES)
1 1/3 cups (167 grams) all-purpose flour
1 cup (100 grams) freshly grated pecorino Romano cheese
1 teaspoon kosher salt
3/4 teaspoon freshly ground black pepper
Cooking spray, for greasing the pan (optional)
DIRECTIONS
Place a 6-cup popover pan on a rack in the middle of the oven and preheat to 450 degrees.
In the pitcher of a blender, combine the eggs, milk and olive oil and blend for 15 seconds to combine. Add the flour, cheese, salt and pepper and blend for another 15 seconds, scraping down the sides of the blender with a flexible spatula, if necessary.
Carefully remove the hot pan from the oven and brush with olive oil or spray with cooking spray, if using. Evenly pour the batter into the cups; each one should be about three-quarters full (see NOTES).
Bake for 15 minutes, then reduce the heat to 350 degrees and bake for an additional 10 to 15 minutes, or until the popovers have risen considerably and are golden brown. Do not open the oven while they bake.
Remove from the oven and jab each popover with a paring knife to release steam. Remove the popovers from the pan and transfer to a wire rack. They should slip out easily, but if they do not, run the same knife around the edges.
Popovers are best eaten within minutes of being pulled from the oven, generously spread with softened, salted butter.
Nutrition per serving (1 popover), based on 12 | Calories: 157; Total Fat: 9 g; Saturated Fat: 4 g; Cholesterol: 71 mg; Sodium: 309 mg; Carbohydrates: 12 g; Dietary Fiber: 1 g; Sugar: 1 g; Protein: 7 g
This analysis is an estimate based on available ingredients and this preparation. It should not substitute for a dietitian’s or nutritionist’s advice.
From food writer Jessie Sheehan.
– – –
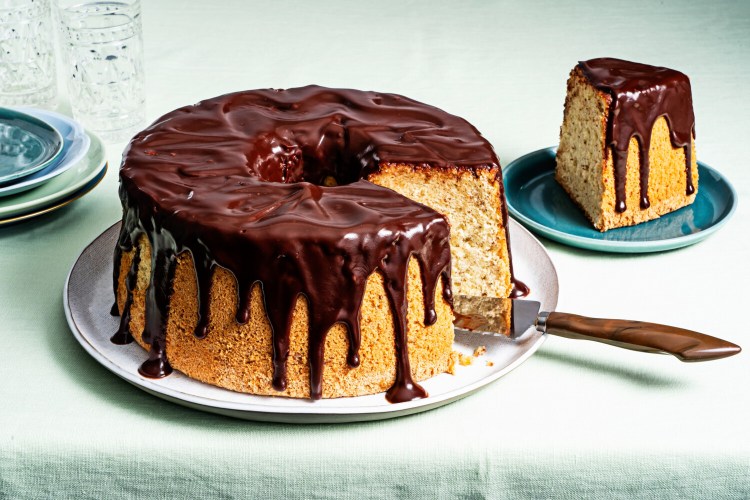
Hazelnut Chiffon Cake With Nutella Ganache
Active time: 30 minutes | Total time: 3 hours, 15 minutes (includes cooling time)
12 to 16 servings (1 large cake baked in a 10- to 12-cup tube pan)
A chiffon cake is a splendidly tall, wildly easy, oil-based cake. It is rich in flavor from egg yolks, yet wonderfully light in texture because of copious amounts of stiffly peaked whites. The cake is whisked together in a single bowl (you’re welcome) except for the whipped whites, which get added at the end.
Here, ground hazelnuts replace some of the flour and contribute wonderful texture (and color) to the cake’s moist, airy crumb. And a ganache made of Nutella, or your favorite brand of hazelnut chocolate spread, not only adds some welcome sweetness, but also beautifully compliments the toothsome, flavor and texture of the ground hazelnuts in the cake.
NOTES: Chiffon cakes are traditionally baked in an ungreased tube pan with a removable bottom, in a low oven, for a long time. And it is when the cake emerges from the oven that the drama really begins. Rather than cool the cake right-side up on a rack, the cake is turned upside down to cool. Many tube pans come with tabs or feet that allow you to invert the pan for cooling. If yours does not, suspend the pan on the neck of a bottle, such as a wine bottle. This will help the cake retain its height. (If you don’t have a suitable pan or a bottle that works with your pan, the cake should deflate only slightly.)
There is no need to peel the hazelnuts, as the skins add color and texture, too. If you do not have a food processor, consider buying hazelnut flour.
Make Ahead: Make the cake up to 36 hours before you want to serve it and store it at room temperature, unglazed and covered with a large bowl or tightly wrapped in plastic wrap. Like other oil-based baked goods, it is even better on the second day.
Storage Notes: Leftover cake can be lightly wrapped in plastic wrap or covered with a large bowl, and stored at room temperature for up to 3 days.
INGREDIENTS
FOR THE CAKE
7 large eggs, cold or at room temperature, whites and yolks separated
1 2/3 cups (335 grams) granulated sugar, divided
3/4 cup (180 milliliters) cold tap water
1/2 cup (120 milliliters) vegetable or hazelnut oil
1 tablespoon baking powder
2 teaspoons vanilla extract
1/2 teaspoon kosher salt
2 cups (225 grams) cake flour
1 cup (130 grams) whole hazelnuts, finely ground in a food processor, or 1 1/2 cups (130 grams) hazelnut flour or hazelnut meal (see NOTES)
1/4 teaspoon cream of tartar
Chopped hazelnuts, for decorating
FOR THE GANACHE
1 cup (285 grams) Nutella or another chocolate-hazelnut spread
1/2 cup (120 milliliters) heavy cream
1 tablespoon vegetable or hazelnut oil
DIRECTIONS
Position a rack in the middle of the oven and preheat to 325 degrees. Have ready an ungreased 10- to 12-cup tube pan with a removable bottom.
In a large bowl, whisk the egg yolks, 1 cup (200 grams) of the sugar and the water for about 30 seconds, until the mixture lightens slightly in color. Whisk in the oil, baking powder, vanilla and salt.
Sift the cake flour into the bowl, add the ground hazelnuts and whisk until just combined.
In the bowl of a stand mixer fitted with the whisk attachment, whip the egg whites and cream of tartar on medium-low until the egg whites become frothy, about 2 minutes. Next, whip the mixture on medium-high until, when you lift the whisk out, a soft peak forms and flop over at the tip, about 3 minutes.
With the mixer on medium, slowly add the remaining 2/3 cup (135 grams) of granulated sugar to the egg whites. Increase the speed to medium-high and continue whisking until stiff peaks form, about 3 minutes. If they flop over, they need more time; if they hold a point, you’re set.
Gently fold a third of the whipped whites into the batter until they disappear. Be sure to fold with the lightest touch, so as not to deflate the whipped egg whites. Add another third and fold them in, followed by the final one, folding until just combined.
Transfer the batter to the pan, smooth the top with a small offset spatula and bake for 1 hour to 1 hour and 10 minutes, or until the top springs back when pressed with a fingertip and a cake tester inserted in the middle comes out with a moist crumb.
Remove from the oven and, if possible, invert the cake onto a thin-necked bottle, such as a wine bottle. Cooling the cake upside down keeps it from slightly deflating (see NOTES). Let cool for about 1 1/2 hours, or until it comes to room temperature.
To remove the cake from the pan, gently run a long knife around the outside edge of the cake and around the inside tube. Remove the sides of the pan, run the knife between the bottom of the cake and the pan and carefully lift the cake off the pan. Place it on a cooling rack set over a baking sheet.
To make the ganache, place the Nutella in a small bowl. In a small saucepan over medium heat, warm the cream until tiny bubbles appear around the edges, about 3 to 5 minutes. Pour the cream over Nutella and let it sit for about 1 minute. Using a fork, begin stirring from the center of the bowl until the cream and Nutella are thoroughly combined. Add the oil and continue to stir until emulsified.
Generously drizzle the cooled cake with the ganache, letting it decoratively drip down the sides. You will have some ganache left over. Let the glazed cake set briefly, about 15 minutes, before serving. Slice and serve with more ganache.
Nutrition per serving (1 slice), based on 16 slices from a cake baked in a 12-cup tube pan | Calories: 406; Total Fat: 23 g; Saturated Fat: 8 g; Cholesterol: 92 mg; Sodium: 151 mg; Carbohydrates: 45 g; Dietary Fiber: 2 g; Sugar: 31 g; Protein: 6 g
This analysis is an estimate based on available ingredients and this preparation. It should not substitute for a dietitian’s or nutritionist’s advice.
From food writer Jessie Sheehan.
Send questions/comments to the editors.

Success. Please wait for the page to reload. If the page does not reload within 5 seconds, please refresh the page.
Enter your email and password to access comments.
Hi, to comment on stories you must . This profile is in addition to your subscription and website login.
Already have a commenting profile? .
Invalid username/password.
Please check your email to confirm and complete your registration.
Only subscribers are eligible to post comments. Please subscribe or login first for digital access. Here’s why.
Use the form below to reset your password. When you've submitted your account email, we will send an email with a reset code.