

Many of us love preparing a homemade treat, even on a weeknight, but aren’t crazy about baking projects (the kinds that call for running to two grocery stores for hard-to-source ingredients and tackling several components over several hours – if not days). Nor are we fond of doing dishes. I don’t think I’m the only one who has assembled something sweet over the better part of an evening, finally placed it in the oven, turned to a sink piled high with dirty bowls, ramekins and measuring cups, and thought, “I am never doing this again.”
Well, with one-bowl baking, you may never have to.
One-bowl baking, for the unfamiliar, is for busy folks who delight in baking delicious treats with short, easy-to-follow recipes, using pantry-friendly ingredients that mix up quickly in just one bowl. It is for those of us who constantly search for timesaving methods when it comes to meal-prep, but really wish we could find such shortcuts to making dessert (which is everyone’s favorite dish anyway, right?).
A one-bowl baked good is essentially the dessert world’s equivalent of a sheet-pan dinner. And just as assembling dinner on a single pan, or in a single “bowl” (i.e.: in an Instant Pot or slow cooker) continues to trend with those of us short on time, it is hardly a leap to conclude that recipes for sweets that are similarly effortless to prep (and clean up) could easily become all the rage.
In fact, a Google search reveals a plethora of one-bowl baking recipes ready for the making, including the chocolate snack cake, blackberry cobbler and cheesy jumbo muffins with prosciutto and chives.
But what about all those go-to recipes dog-eared in your cookbooks; or surreptitiously ripped from a magazine in your doctor’s office; or bookmarked from that blog you love? In other words, what do you do with the recipes you already turn to, again and again, for your son’s birthday cake, your mom’s Christmas cookie box and your roommate’s “I broke up with my boyfriend – again” sympathy caramels? What if, with a few simple tweaks and twists, you could change those recipes into one-bowl wonders?
To simplify my baking, I have several strategies I rely on over and over again, and you can, too. Of course, not every recipe can be converted – for instance, those calling for beating yolks and whites separately will never a one-bowl wonder make – but favorites including upside-down cakes, pavlovas, whoopie pies and many others convert brilliantly to a one-bowl assembly. Here, I share the tools every one-bowl baker needs in their arsenal, as well as a few of my favorite tips for putting them to work.
THE ONE-BOWL BAKER’S TOOL KIT
A large glass mixing bowl is not only the “one dirty bowl” in which many one-bowl recipes are assembled, but is also the ideal vessel for a recipe that begins with melting butter (or chocolate) in the microwave. A large metal mixing bowl works as well, but to heat its contents, you must create a makeshift double-boiler over a pot of simmering water on the stove top. Hardly a tragedy, but a glass bowl, plus microwave, simplifies the process.
A large (4-cup) glass measuring cup not only measures liquid ingredients, and like the large glass mixing bowl, is handy for melting chocolate and butter in the microwave, but it is also the perfect container in which to prepare an egg wash to brush on biscuits, for instance.
A digital scale for measuring your dry ingredients indisputably reduces the number of dirty utensils needing to be cleaned. And as luck would have it for the one-bowl baker, many baking recipes now include weight measurements (I prefer those calling for grams, which are tinier and more precise than ounces, and thus easier to work with.) I still recommend holding on to your liquid measuring tools (a glass measuring cup, for example), but dry ingredient cups and (oftentimes) measuring spoons become delightfully obsolete when you have a scale on the kitchen counter.
A fine-mesh sieve is essential for ensuring your dry ingredients get mixed together before being added to your wet ones, since you won’t be whisking them first in a separate bowl. Sift your dry ingredients directly over your mixing bowl or onto a sheet of parchment (my favorite).
A roll of parchment paper is not only your best friend when lining a pan, but is also the perfect landing (and resting) pad for sifted dry ingredients. Moreover, a sheet of parchment can be recycled for this purpose. Store it folded up in a zippered plastic bag or rolled up with a rubber band around it, flattening it out on the counter before reusing.
THE ONE-BOWL BAKER’S STRATEGIES FOR CONVERSION
Reject mise en place. Mise en place is the process of measuring and setting out all the recipe’s ingredients in a variety of bowls before cooking and is – you guessed it – the antithesis of one-bowl baking. One-bowl bakers may still organize their ingredients before starting to assemble the recipe, but they scoop or pour directly from the ingredient’s vessel (a bag or a jar) into the designated bowl or sieve.
Modify the order of assembly. When one-bowl baking, there are no extra bowls in which to prep ingredients. Converting a favorite recipe to a one-bowl wonder, therefore, typically requires that you save the following steps for last: adding dry ingredients, prepping add-ins and, perhaps, mixing up such last-minute flourishes as a tasty cinnamon-sugar mixture for sprinkling. Additionally, without the extra bowls, tricky-to-incorporate ingredients, such as powdery thickeners, need to be added in a sequence to maximize their mixability (such as, when making a cobbler, combining arrowroot or cornstarch with sugar in your one bowl, and mixing the two, before adding the berries, will help the berries to evenly absorb the thickener).
Reuse measuring tools for holding small amounts of ingredients. For instance, when making the cobbler recipe, squeeze the lemon directly into a measuring cup, which you will later use to measure the buttermilk and, finally, to whisk an egg wash.
Reuse the bowl for frostings and fillings. After scraping every bit of your cake batter into a baking pan, a quick wipe with a paper towel is all your bowl needs before adding frosting or filling ingredients.
As these tools and strategies reveal, easy baking with little cleanup – even on a weeknight – is 100 percent within your reach. Converting baking recipes you love to a one-bowl assembly requires nothing more than a little forethought about which tools you will pull from your cabinets and how you will creatively use them, about how you collect your ingredients before baking with them, and about the rejiggering of your recipe’s steps. Done, done and done.
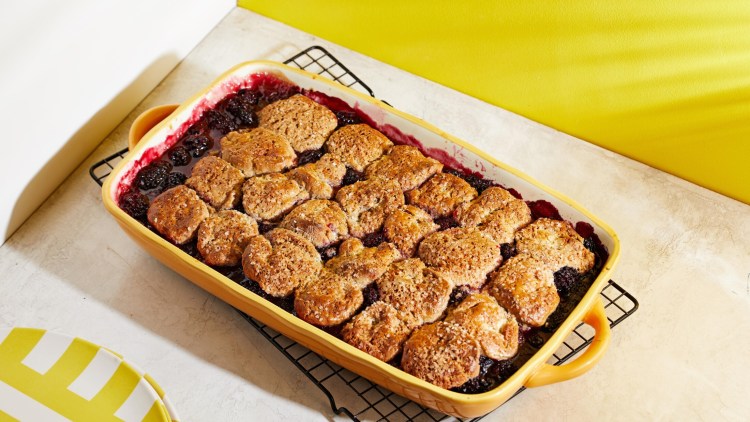
ONE-BOWL BLACKBERRY COBBLER WITH EASY CINNAMON-SUGAR BUTTERMILK BISCUITS
Active: 30 minutes | Total: 1 hour 20 minutes
16 servings
Here, sweetened blackberries are blanketed with a glorious topping of easy-peasy biscuits that do not require a biscuit cutter. (You’re welcome.) The biscuits are not only lightly sweetened and flavored with cinnamon, they are also topped with cinnamon sugar and a sprinkling of raw sugar, too, for sparkle and crunch.
If you would like to use a different berry, you may need to reduce the amount of thickener, as blackberries require more than other berries. The amount of sugar you use will depend on how tart or sweet your fruit is, so once you’ve stirred in the lesser amount of sugar, taste and assess before adding more.
Serve with vanilla ice cream or a drizzle of heavy cream (the author’s favorite).
Make Ahead: The cobbler will keep loosely covered with plastic wrap at room temperature or in the refrigerator for up to 3 days. Leftovers are best covered with foil and reheated in a 300-degree oven for a few minutes before serving.
For the filling:
1 to 1 1/2 cups (300 grams) granulated sugar, or as needed
6 tablespoons (39 grams) arrowroot powder or cornstarch
1/2 teaspoon (3 grams) table salt
About 2 1/2 pounds (8 cups) fresh blackberries
2 tablespoons fresh lemon juice
For the biscuit topping
2 cups (290 grams) self-rising flour, or more as needed
1/4 teaspoon (2 grams) baking soda
1/2 cup (100 grams) granulated sugar
1 1/2 teaspoons (3 grams) ground cinnamon, preferably freshly ground from soft sticks
8 tablespoons (1 stick) cold unsalted butter, cut into cubes
3/4 cup regular or low-fat buttermilk
1 large egg
1/4 teaspoon (1 gram) table salt
Raw sugar, for sprinkling
For the filling: Preheat the oven to 425 degrees.
Whisk together 1 cup (200 grams) of the granulated sugar, the arrowroot powder or cornstarch and the salt in a 13-by-9-by-2-inch baking dish (preferably ceramic, but metal or glass work as well). Add the blackberries and toss to coat using your fingers or a wooden spoon. Pour the lemon juice evenly over the mixture and toss gently to coat. Taste a well-coated berry, and add more or all the remaining 1/2 cup (100 grams) of granulated sugar, as needed.
For the biscuit topping: Whisk together the flour, baking soda, 1/4 cup (50 grams) of the granulated sugar and 1 teaspoon (2 grams) of the cinnamon in a mixing bowl. Add the cold, cubed butter and use your fingers to rub it into the flour mixture. Pour in the buttermilk and stir with a wooden spoon, to form a shaggy dough.
Dump the dough onto a work surface, making sure to include all bits of from the bowl. You should not need to dust your work surface or your hands with extra flour, but if your dough is unusually sticky, by all means, do so. Knead the dough once or twice, divide it in half and roll each portion into a skinny 12-inch log. Slice each log into twelve 1-inch rounds, gingerly arranging them in rows on top of the blackberry filling and reshaping/correcting their round shapes, as needed, as you work.
Whisk together the egg and salt (in the measuring cup you used to measure the buttermilk); use this to brush the tops of the dough rounds.
Wipe out the now-empty mixing bowl with paper towel, as needed. Add the remaining 1/4 cup (50 grams) granulated sugar and the remaining 1/2 teaspoon (1 gram) cinnamon, whisking to blend well. Sprinkle the mixture evenly over the rounds of dough, then sprinkle a little raw sugar on each one.
Bake (middle rack) for 10 minutes and then reduce the heat to 375 degrees; continue to bake for 40 to 50 minutes total, until the biscuits are nicely browned and the filling is bubbling between them. Check on the cobbler at 40 minutes by inserting the tip of a paring knife between the biscuits in the center to check on the filling beneath and to see whether the biscuits are cooked through.
If the biscuits are nicely browned on top, but not beneath, and/or the filling is not bubbling in the center, cover the cobbler with foil and continue to bake until bubbling is uniform across the top of the cobbler, and the biscuits are cooked through, about 5 minutes more.
Let cool slightly before serving. The filling will continue to set as it cools; for a less-runny filling, try waiting until the cobbler cools to room temperature.
Nutrition | Calories: 260; Total Fat: 6 g; Saturated Fat: 4.5 g; Cholesterol: 30 mg; Sodium: 370 mg; Carbohydrates: 50 g; Dietary Fiber: 4 g; Sugars: 31 g; Protein: 4 g.
Copy the Story Link
Send questions/comments to the editors.

Success. Please wait for the page to reload. If the page does not reload within 5 seconds, please refresh the page.
Enter your email and password to access comments.
Hi, to comment on stories you must . This profile is in addition to your subscription and website login.
Already have a commenting profile? .
Invalid username/password.
Please check your email to confirm and complete your registration.
Only subscribers are eligible to post comments. Please subscribe or login first for digital access. Here’s why.
Use the form below to reset your password. When you've submitted your account email, we will send an email with a reset code.